In the first two parts of our series, we’ve looked at the skills you’ll need to be get started using AutoLISP as a beginner and what will elevate you to a higher, intermediate level. In this post, we’ll explore what it means to call yourself an advanced programmer.
Notice I used the term “advanced”—not “expert.” I make this distinction for a couple of reasons. For one thing, there are very few real experts out there; you’re always learning and advancing your skills. More importantly, you can to do some amazing things with AutoLISP and some advanced skills will take you to a whole other level.
Contents
What You Should Know By Now
By now, you have a firm grasp of most, if not all, core AutoLISP functions. More than likely, you’ve also moved on from them and into the realm of the object based Visual LISP world. Your coding style has become concise and consistent, and you routinely employ error handling within it.
Note: Error handling can come in various ways. One way is to simply use good programming techniques to start with. I call that inline error trapping or stopping problems before they start.
(if (setq fname (findfile “myFile.txt”)) < make sure the file is there before continuing.
You should also create your own error handler by setting the internal error function to your own.
(setq error myErrorFtn) ;;; this comes near the top of your defun
(defun myErrorFtn (msg) ;;; then write your own error function
;;; prompt the user using the msg argument
;;; reset any sysvars etc.
;;; also reset the internal error to nil )
You may also use the Visual LISP VL-CATCH-ALL-APPLY method which allows you to intercept errors and continue processing.
No doubt your programming has also ventured outside of AutoLISP (and Visual LISP), and you often find the need to import COM libraries to access other programs.
You’ve probably also explored creating event-driven code by utilizing VLR reactors. You’re not relegated to using the memory space of the current drawing either, as you’ve begun storing variable data in the registry for use at another time or in another drawing.
You’re also not restricted to operating on a single file. Most advanced users have mastered the art of working on entire folders full of .dwg files. And, since they’re potentially working on hundreds or even thousands of files. And, they’ve learned how to do so without the interface, by opening and running their code via an ObjectDBX connection.
Ways an Advanced User Can Automate Even More
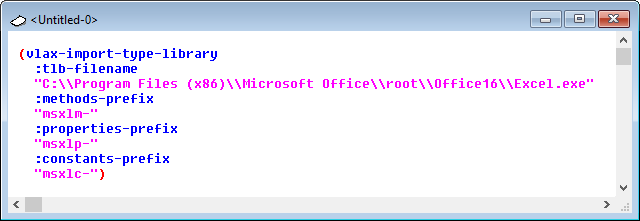
Let’s start with importing COM libraries by looking at a real-world example. A client of mine maintains a spreadsheet for each of their projects. There are around 100 data entries in this file. For each project, they would manually copy the data into custom fields within DWGPROPS, which is in turn read by FIELDS – mainly on the cover page. Of course, this led to tedious work, and human error. That’s where I came in.
I bypassed their whole process by importing the Microsoft Excel library with VLAX-IMPORT-TYPE-LIBRARY, then reading the data directly from the spreadsheet and into DWGPROPS using a combination of AutoLISP and Visual LISP.
Is it easy? Not necessarily, but once you have the inspiration and enough skill, it’s not hard to find all the example code you’ll need out on the web. If you’re at this advanced level, no doubt you’ve also mastered that skill as well.
Next come Reactors. Consider a couple of scenarios: You may want to execute some code when a drawing is closed. Or maybe you’d like to prevent your users from exploding dimensions. That’s where reactors come into play.
Think of them as functions you write that hang out in the background waiting on certain events to happen. They only execute when that event happens – thus the Event Driven moniker.
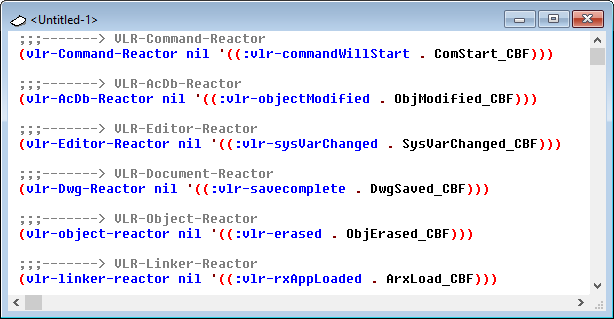
Below are some examples of the various reactor types you can create, along with a sample reactor for each. The syntax is the same for all types: the reactor function, followed by any AutoLISP data needed (or nil as I use here), then a list of the events to watch for. This dotted pair consists of the reactor and the callback function, which is the function you’ll write to do that thing you do when the desired event occurs.
Note: Please note that the callback function you’ll write receives two arguments. The first identifies the calling reactor, and the second is a list of parameters regarding the event. This list will vary depending on the type of the reactor and is what you’ll query within your callback function.
I also wrote about your super-power, applying your powerful AutoLISP functions across multiple files and folders. By now, you have your own method, whether it’s self-written or a third-party tool. Think about the enormous power that gives you.
Let’s say there’s an entire project with an issue that is best fixed via some API (in your case, AutoLISP), and you save the day by using AutoLISP to open each of them, you apply your function, save, close, and move on to the next. You’re literally the department hero. Sure, it takes a while to operate on hundreds of files that way, but it sure beats doing it manually, not to mention being more reliable.
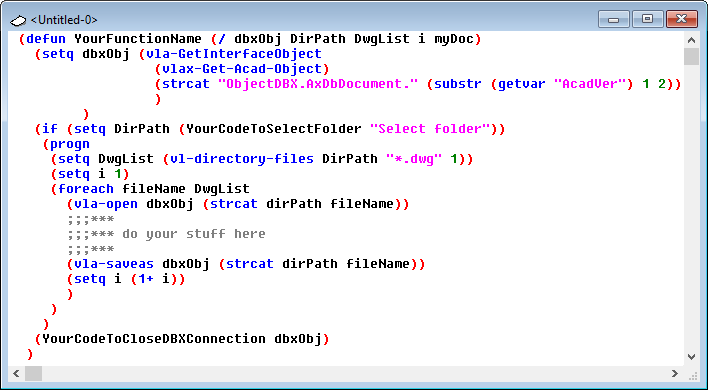
So how do you go from hero to superhero? Now you use ObjectDBX. Simply put, it’s a AutoLISP connection directly into the dwg file database. Who needs that pesky interface anyway?
You’ll gather your list of files, loop through it, and open each using ObjectDBX to perform your task. Go ahead an enjoy the accolades, raise and promotion you’ll get when you not only save the day, but you do so in mere seconds instead of the hours your open/fix/save method took.
(As usual, the sample code below isn’t ready for prime time, it’s just meant to get you thinking.)
Note: I do need to add this caveat. ObjectDBX is great, but not everything in AutoCAD is exposed to it. You can do a lot within an ODBX connection, but not everything.
Final Thoughts
I hope you’ve enjoyed reading this series as much as I’ve had writing it. We’ve gone from focusing on those with little or no experience and what they need to know to get some simple yet highly effective automation for their tasks, to the seasoned veteran, and most points in between.
My examples of what you can do at each level are certainly not all-inclusive, but instead were intended to be food for thought. What you need and what you come up with are entirely your own, but I hope I’ve provided some inspiration for your journey.
In part one’s closing remarks, I mentioned my mentor from back in the day. His name is Bill Kramer, and he inspired many of us with his examples, tutorials, articles, and humor. So as I close this series of articles, I’ll end the same way I did in the others, and with the same plea Bill used at the end of all of his articles: “Until next time, keep on programmin’.”
Source: Autodesk