I’ll admit it. I just love AutoLISP, and I consider it my “home” language.
But I also understand that my love of the language isn’t universal. You may not consider yourself a programmer, or it might just be intimidating. It really doesn’t have to be, and even with just minimal knowledge, you can still accomplish a lot.
This three-part series will help you become aware of the kinds of things you can do with AutoLISP at three levels of expertise: Beginner, Intermediate, and Advanced. Right now, we’ll start at the very beginning.
Contents
What a Beginner Should Know
I think it’s important for any AutoLISP user to know what it is. LISP stands for LISt Processing. That’s your first clue. Everything in the language is a list in some form. You’ll need to know about them, whether they’re defined as a LIST, a CONS, a DOTTED PAIR, or an S-EXPRESSION (or just EXPRESSION for short).
Of course, there are various data types you’ll need to be familiar with. AutoLISP considers a LIST or a CONS as a data type. Others include STRINGS, REAL numbers, and INTEGERS.
Note: One of the reasons AutoLISP is so easy for non-programmers (people like us) is that you don’t have to manage data types and memory allocation like other languages. There’s no need to compile your code either. In fact, the interpreter is built into AutoCAD, so you can run expressions right from the Command Line.
As for basic Terminology and Syntax, you should know that items within a list are ATOMS. The functions that AutoLISP uses are called…FUNCTIONS—that’s easy! And FUNCTIONS sometimes require ARGUMENTS. Those are the ATOMS that follow the Function call in the expression.
Syntax can be defined as the rules that any kind of language uses. The basic rules of AutoLISP are that everything is contained within a set of parentheses. Next, is that the function is always the first item (or ATOM) in a list.
(functionName argument1 argument2 …)
Note: It’s important to note here that every Expression returns a value. That’s an important point, as it sets AutoLISP apart from other languages that are considered “Procedural” languages. In the simplest terms, those languages execute a line of code, move on to the next, and so forth until complete. Without going into a dissertation on “Functional” languages, just remember that while we may tend to use AutoLISP in a procedural manner within a CAD program, it is much more powerful than that.
You should be aware that expressions can be nested, and that you evaluate them from the inside out.
(functionName argument1 (functionName argument1 argument2) argument3 …)
A beginner should be aware of internal AutoLISP functions, especially DEFUN and SETQ. Others may include:
- AutoLISP specific functions: COMMAND, GETVAR, SETVAR
- AutoLISP specific “GET…” functions: GETSTRING, GETREAL, etc.
- Basic list manipulation functions: LIST, CONS, CAR, CDR, NTH
- Basic conditional functions: IF, COND
- Equality functions: = /= < > EQ EQUAL
- Math Functions: + – / etc.

What else should a beginner know? You should know how to load external AutoLISP files (LOAD, APPLOAD, Drag and Drop), and how to identify the Function name needed to run them at the Command Line.
Finally, you should know how to get help. Whether via AutoCAD’s own Help system or various sites and forums on the internet and Autodesk Knowledge Network, don’t hesitate to reach out. There’s some 35 years of experience and code out there, and someone is always willing to help.
That may appear to be a lot of stuff to know, but a little goes a long way with AutoLISP. Which leads us to the next section…
Ways a Beginner Can Use AutoLISP To Automate Tasks
With just a basic level of AutoLISP knowledge, you should be able to do the following things.
Control your AutoCAD environment. Make sure your OSNAP settings are always set the way you like them by using (setvar “OSMODE” 679). 679 equates to the running osnaps I like. Not sure what your favorites add up to? Use (getvar “OSMODE”). No longer do you need to open the Object Snap dialog and check and uncheck boxes. You’ve just automated it! Almost any environment variable you can think of can be set this way.
You can create your own keyboard short commands. You probably are aware of the limitations of the Command Aliases found in the ACAD.pgp file. You can alias the command name, but you can’t include any options.
For example, Z is for Zoom. But you still have to enter E to get Extents. With just a little AutoLISP knowledge a beginner should be able write their own custom ZE command:
(defun c:ze ()
(command “zoom” “e”)
(princ)
)
Do you find yourself using Move Previous often? Automate it!
(defun c:mp ()
(command “move” “p”)
(princ)
)
We’re always talking about keeping your drawings clean. Purge and Audit, we tell you. Get rid of unused REGAPPS, and also run Overkill. Why not use your new AutoLISP knowledge to automate this sequence? You should have all the tools you need to write something like the following:
(defun c:cleaner ()
(command “audit” “Y”)
(command “-purge” “a” “” “n”) (command “-purge” “r” “” “n”)
(command “-overkill” “all” “” “”)
(princ)
)
Note: Two things from the above code. The call to (princ) at the end suppresses the functions returned value of nil on the command line. Also, the dash in front of the Purge and Overkill command calls suppresses the command’s dialog box and uses the command line version instead. Lots of other commands do this. Experiment…make or set your layers with -Layer. Just follow the prompts on the command line, and you’re on your way.
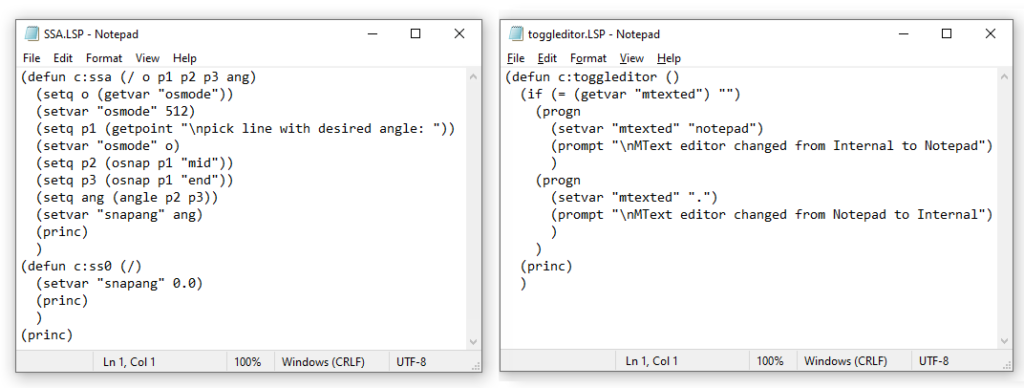
The last two examples make new commands. SSA sets the SNAPANG variable based on a selected line. Below it, SS0 resets it to zero. On the right, TOGGLEDITOR changes MTEXTED from the internal editor to Notepad, and back again.
I presented these as an image to force you to type them, should you want. Copy and paste is handy, but you have to be able to type them as well. Also, don’t use MS Word, as it adds special formatting. Notepad works fine.
Finally, an AutoLISP beginner should know how to add their custom command to their menu. Make your own Ribbon tab and panel or add it to an old-fashioned toolbar button for easy access.
Final Thoughts
In part two of our series, I’ll discuss some of the AutoLISP functionality you’ll need to know to become what I would call an Intermediate level, and what kinds of things you can do with those skills.
And finally, to quote my original AutoLISP mentor from way back in the day, “until next time, keep on programmin’.”
Source: Autodesk