Hopefully you’ve been following along with our series on becoming a master of sheet sets in AutoCAD. (If you need to catch up, don’t worry, you can read it all here).
In this next portion of the series, it’s time to really put your newfound sheet set knowledge into practice and implement it for maximum efficiency. To take full advantage of sheet set functionality you may need to change your workflow a little. It’s not a drastic change. But depending on how far along you are with your project, you may want to use the next steps when you start a new project using an appropriate workflow.
First up? How to create sheet views in AutoCAD!
Contents
Creating Sheet Views
If you create “sheets” using traditional tools, you might create a drawing using your template and then attach external references of your model, create viewports on the layouts, set the viewport scale, and insert a view label to describe that particular view or detail. The same concepts apply using sheet set functionality, except the process is automated!
Assuming your Xref drawings are in a particular folder on your hard drive (or on a network drive), you can add that folder (or folders) as a sheet set property. This will enable you to have easy access to your Xref drawings from within the Sheet Set Manager.
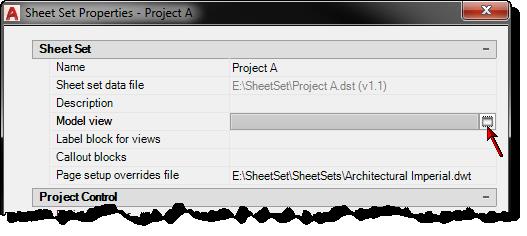
1. In the Sheet Set Manager, right-click on the sheet set title and choose Properties.
2. In the Sheet Set Properties dialog box, select Model view and choose the button to access the Model view dialog box.
3. In the Model view dialog box, choose Add and navigate to the folders that contain the xrefs (model geometry) that you want easily accessible for this sheet set. You can add as many locations as you want.
4. Choose OK to close all of the dialog boxes and accept the changes.
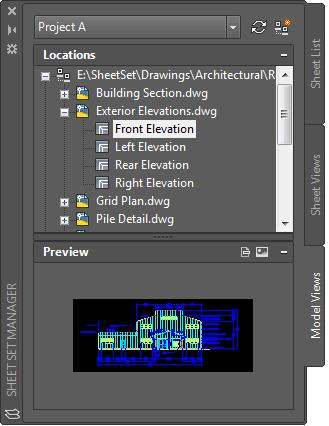
So far, all of your work in the Sheet Set Manager has been on the Sheet List tab. However, as you have probably noticed, there are two other tabs: Model Views and Sheet Views. The Model Views tab displays a tree view of the resource drawing locations you added in step 3 above and you can add locations directly from the Model Views tab. If you expand the file location node, you can see all the folders and drawings in that location. If you expand a drawing node, you will see the named model space views within that drawing. If the drawing does not contain named model space views, it will only expand as far as the drawing file itself.
Using the Model Views tab, you can easily add content to your sheets. Rather than going through the manual process of attaching an xref and creating and scaling a model space viewport, you simply drag a resource drawing onto your sheet.
1. In the Sheet Set Manager, select the Sheet List tab.
2. On the Sheet List tab, open a sheet to which you want to add content.
3. Select the Model Views tab.
4. On the Model Views tab, navigate to the drawing file you want to attach as an Xref in your sheet.
5. Select a drawing or named model space view within the drawing and drag it onto the sheet. You can simply pick a point on the layout and AutoCAD will automatically determine an appropriate scale based on the size of the drawing/view and layout. However, since you probably want the new layout viewport to be at a particular scale, you can specify the scale before you place the viewport on the layout.
6. Before you specify the insertion point for the new viewport, right-click and select an appropriate scale from the list.

7. Specify the insertion point to place the viewport in the drawing.
So what exactly happened during this process? Nothing magic! AutoCAD did exactly what you do using traditional methods, but it did it in a lot fewer steps! AutoCAD attached the resource drawing file to the sheet drawing as an external reference with an insertion point at 0,0. It created a layout viewport and set the viewport scale. Regardless of whether you select a drawing or named model space view from the Model Views tab, AutoCAD attaches the entire drawing. Your selection (the dwg or a particular model space view) determines how much of that Xref will be displayed in the new layout viewport. If you select a drawing, the new layout viewport displays everything that was visible in model space of the Xref file. If you select a named model space view, the new layout viewport displays everything that was visible in that named view; taking into account the layer visibility as well as the view boundaries. If you are not familiar with named views, this is a good time to learn more about them.
While the behavior above is likely very similar to how you already work with Xrefs, the automated behavior may require you to change some of your existing workflows. For example, you may need to start using named views and ensuring that each named view or Xref has only the necessary information with an appropriate insertion point of 0,0.
What’s Next?
In the next article, we’ll take a look at how to add view labels. Remember, you can always catch up on the entire Mastering AutoCAD Sheet Sets series!
Source: Autodesk