You can start commands from a user interface element, such as the ribbon or toolbar, or enter them directly at the Command prompt. Entering commands directly at the Command prompt can be more efficient than trying to locate them on the ribbon or a toolbar. Even for people who use AutoCAD every day, it’s easy to overlook some of the productivity features available for the command window.
In the command window you can:
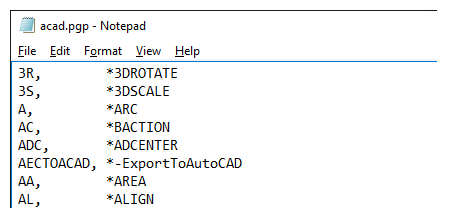
- Start a command or system variable by its full name or alias
- Search for a command or system variable
- Access online help and other content on the Internet related to a command or system variable
- See the prompts for the active command
- Choose an option or provide a value for the active command
- Insert a block, or set a layer or named style current

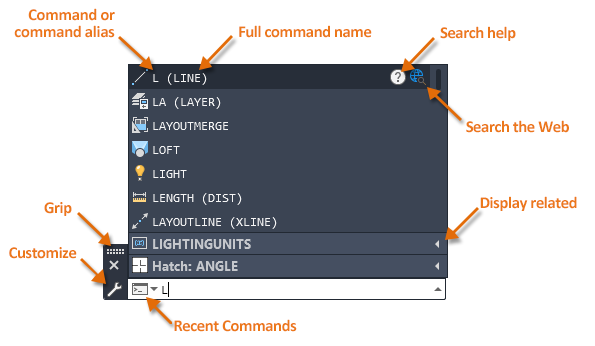
When you start typing, the letter L in this example, available commands and system variables are displayed in a list. We call this the AutoComplete list. You can then choose the command or system variable you want to use.
Contents
Configure AutoComplete
AutoComplete allows you to quickly find a command, system variable, or named object based on a list of suggestions. The items shown in the AutoComplete Suggestions list can be filtered by entering one or more letters at the Command prompt. By default, the suggestions listed either start with or contain the letters as you type them.
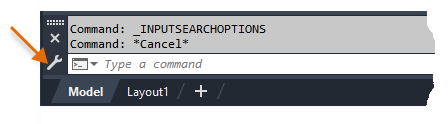
- In the command window, click the Customize button.

- On the menu, click Input Search Options.
- In the Input Search Options dialog box, make sure the options match the default input search settings used to populate the AutoComplete Suggestions list as shown below.
- Click OK.

Use AutoComplete to Find a Command or System Variable
As you enter text in the command window, the AutoComplete Suggestion list becomes filtered based on that letter sequence.
- Click in the command window and type line but don’t press Enter.
After a short delay, the AutoComplete Suggestions list appears and is filtered based on the entered text. Commands and command aliases that match the entered text are listed at the top, while system variables are grouped under the first expandable section. Matching hatch patterns and named objects display in other collapsible sections under the system variables.
- Click the PLINE item to start the PLINE command.
- Press ESC to cancel the current command.
- At the Command prompt, type line again.
- In the AutoComplete Suggestion list, click the System Variables grouping to expand it.
- Move the cursor over the PLINETYPE item.
- Click the Search in Help icon () to display information about the PLINETYPE system variable in the Help window.
You can also press F1 when a command is active or when the mouse pointer is hovering over an item in the AutoComplete Suggestion list.


 ) to display information about the PLINETYPE system variable in the Help window.
.
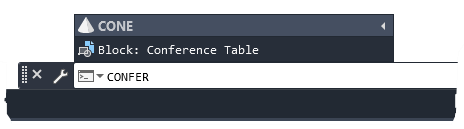
Use AutoComplete to Set a Layer Current and Insert a Block
By default, named objects are listed in the AutoComplete Suggestion list. If you know the name of the layer you want to set current or the block to insert, you can type the name at the Command prompt. Typing the name of a commonly used layer or block can be more efficient than scrolling through the Layers drop-down list or Blocks gallery on the ribbon.
- Open a drawing that contains some layers and blocks.
- In the command window, enter the name of the layer to set current.
The value of the CLAYER system variable is changed to the name of the layer you entered.
- In the command window, enter the name of the block to insert.
The -INSERT command starts and allows you to insert the block.

Use a Recent Command or Entered Value
AutoCAD maintains a history of recently used commands and entered values.
- Use a Recent Command – Press the Up or Down Arrow keys to step backwards or forwards through a list of recently used commands.
Alternatively, you can right-click in the command window and choose a command from the Recent Commands submenu.
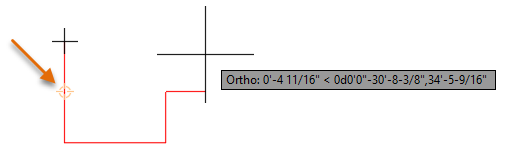
- Use a Recent Value – While a command is active, press the Up or Down Arrow keys to step backwards or forwards through recent values provided at the same or similar prompts. As you step through coordinate values, a glyph appears in the drawing indicating the coordinate point in the drawing.
Alternatively, you can right-click in the drawing window and choose a value from the Recent Input submenu.

Change the Appearance of the Command Window
The color and font used by the command window can be changed if you find the default colors and font hard to read.
- In the drawing window, right-click and choose Options.
- In the Options dialog box, Display tab, under Windows Element, click Colors.
- In the Drawing Window Colors dialog box, under Context, choose Command Line.
- In the Interface Element list, choose the element of the Command and Text window to change.
- Command History – Expanded part of the Command and Text windows
- Active Prompt – Bottom most line in the Command and Text windows
- Temporary Prompt – Previous prompt messages that are displayed above the Command Line window when it is floating and displaying only one row
- Command Option – Keywords listed in the active command’s prompt
The Text window can be displayed by pressing F2 while the command window is docked or Ctrl+F2 when the command window is floating. The Text window allows you to see the command history of the current drawing.
- Click the Color drop-down list and choose a new color for the selected element.
- Repeat Steps 4 and 5 for each element to change.
- Click Apply & Close to save the changes.
Note: Use the Restore buttons to reset the colors of the selected element or context, or all elements in all contexts.
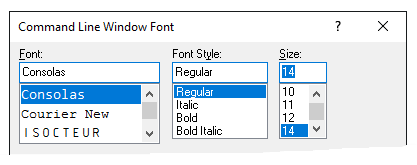
- Click Fonts.
- In the Command Line Window Font dialog box, change the font, font style, and size options for the text displayed in the Command and Text windows.
- Click Apply & close to save the changes.
- Click OK to save all changes made and exit the Options dialog box.


The following explains how to change the height and dock the command window.
- Change the Height of the Command Window – Move the cursor to the top edge of the command window and drag the edge up or down to increase or decrease the number of rows displayed.
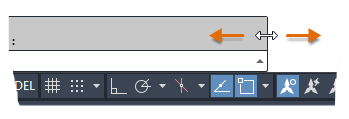
- Change the Width of the Command Window when Floating – Move the cursor to the right edge of the command window and drag the edge right or left to increase or decrease the width of the command window.
- Dock the Command Window – Click and hold the mouse button over the grip on the left edge of the command window and drag the window to a new location at the top or bottom edge of the drawing window. Release the mouse button when the command window arrives.

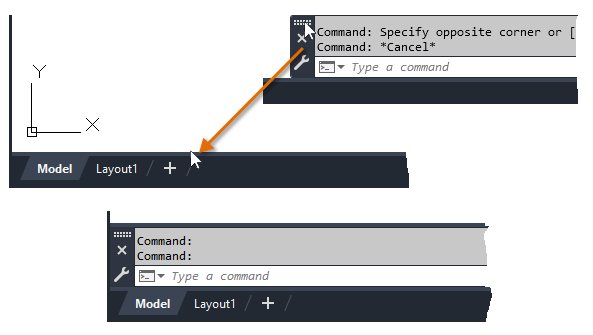
FAQ: Where Did My Command Window Go?
While looking at customer feedback related to the command window, there were many comments related to the disappearance of the command window. In many cases, the command window was turned off accidentally or lost as the result of switching display resolutions. Switching display resolutions can cause the command window to appear off-screen and make it difficult to reposition within the new screen limits.
The following bullets explain how to redisplay the command window. The solutions are listed from easiest and least intrusive to most complex and risky:
- Toggle the display of the Command Window – Do one of the following:
- On the ribbon, click Find
- Press Ctrl+9
- At the Command prompt, enter COMMANDLINE
- Modify the Current Workspace – On the ribbon, click . In the Customize User Interface editor, select the current workspace under the Workspaces node; the current workspace has ‘(current)’ appended to its name. In the Workspace Contents pane, on the right, expand the palettes node and select Command Line. In the Properties pane, set Show to Yes and Orientation to Bottom. Then click Apply to save the changes; the command window should appear floating along the bottom of the drawing window. Change Show and Orientation back to ‘Do Not Change’ and click OK to restore the default behavior.
- Reset the Current AutoCAD Profile – At the Command prompt, enter OPTIONS. In the Options dialog box, Profiles tab, make sure the user profile you want to reset is set current. Click Export and save a copy of your user profile to a safe location. Click Reset and then click Yes to reset the AutoCAD user profile.
Note: Following these steps will reset all custom settings. There is no way to rollback the changes made, but if you export your profile first it can be reimported to restore your previous settings.
- Reset the AutoCAD Program – Click the . Follow the prompts on-screen.
Note: Following these steps will reset all custom settings and files for the AutoCAD program; make sure to contact your CAD Administrator first and backup your custom settings and files before proceeding.
Control the Behavior of the Command Window
You can control the behavior of the command window and the commands entered at the Command prompt by setting certain commands and system variables. Here are the commands and system variables related to the command window.
| Command | Description |
|---|---|
| COMMANDLINE | Displays the Command window |
| COMMANDLINEHIDE | Hides the command window |
| OPTIONS | Customizes the program settings. Use the Drafting tab to change the color and font used by the Command Line window |
| -INPUTSEARCHOPTIONS | Controls settings for display of the command line suggestion list for commands, system variables, and named objects |
| System Variable | Description | Default Value | Saved In |
|---|---|---|---|
| CLIPROMPTUPDATE | Controls whether the command line displays the messages and prompts generated while an AutoLISP or script file is being executed | 1 | Registry |
| CMDDIA | Controls the display of the In-Place Text Editor for the DIMEDIT and QLEADER commands, and the display of certain dialog boxes in AutoCAD-based products | 1 | Registry |
| CMDECHO | Controls whether prompts and input are echoed during the AutoLISP command function | 1 | Not saved |
| CMDINPUTHISTORYMAX | Sets the maximum number of previous input values that are stored for a prompt in a command | 20 | Registry |
| DYNMODE | Turns Dynamic Input features on and off | 3 | Registry |
| FILEDIA | Suppresses the display of file navigation dialog boxes and prompts are displayed when a filename is requested | 1 | Registry |
| INPUTHISTORYMODE | Controls the content and location of the user input history | 15 | Registry |
| INPUTSEARCHDELAY | Sets the number of milliseconds to delay before the command line suggestion list is displayed | 300 | Registry |
There are many ways to interact with AutoCAD and start commands. Experiment with the previously mentioned commands and system variables to tailor the behavior of the command window to maximize your productivity. Use the product’s Online Help system to learn more about these commands and the supported values for the listed system variables.
Source: Autodesk