Do you find yourself repeating the same sequence of commands when working on a drawing? Maybe, you:
- Insert a title block and define some layers as part of an initial drawing setup process.
- Perform the same series of steps to cleanup client drawings.
- Need to update CAD standards defined in older drawings.
Rather than executing a series of commands from the AutoCAD user interface, you can use script files to execute command sequences that rely on the same input. A script is defined as a plain text file with the SCR extension.
Contents
Leveraging Your Knowledge of Commands and System Variables
Scripts allow you to automate repetitive tasks by leveraging your knowledge of commands and system variables. Instead of starting a command from the AutoCAD user interface and then providing a value or entering an option at the Command prompt, you type and store the command sequence in a plain text file using an application like Notepad.
Here is an example of a command sequence to insert a block named tblk, as you might enter it at the Command prompt:
Command: -INSERT
Enter block name or [?] <tblk>: tblk
Units: Inches   Conversion:    1.0000
Specify insertion point or [Basepoint/Scale/X/Y/Z/Rotate/Explode/REpeat]: 0,0
Enter X scale factor, specify opposite corner, or [Corner/XYZ] <1>: 48
Enter Y scale factor <use X scale factor>: 48
Specify rotation angle <0>: 0
The following shows how the previous command sequence might look in a script file:
-INSERT
tblk
0,0
48
48
0
Most command sequences can also be placed on the same line in a script file:
-INSERT tblk 0,0 48 48 0
Creating a Script File
Before you create a script file, you should know:
- A space in a script file is usually the same as pressing Enter, just like pressing the Spacebar when entering options and values at the Command prompt.
Note: If a command allows a string with spaces, such as a layer or style name, a space is interpreted as a character in the string and not as the press of the Enter key. When a string contains a space, surround it by double quotation marks. For example, when providing a name for a new layer (“Title Block”) with the -LAYER command.
- An end of a line marker in a script file is equivalent to pressing Enter.
- A script file must always end with a blank line to ensure the last line is evaluated.
- Avoid commands that display dialog boxes; use the alternative command line equivalent of a command that starts with a hyphen instead. For example, use -LAYER or -INSERT instead of LAYER and INSERT.
After pasting you can then remove any prompts and messages leaving you with just the commands and input you need.
The following steps create a script file that:
- Creates a layer named title_block
- Draws a rectangle that is 828 x 552 units in size
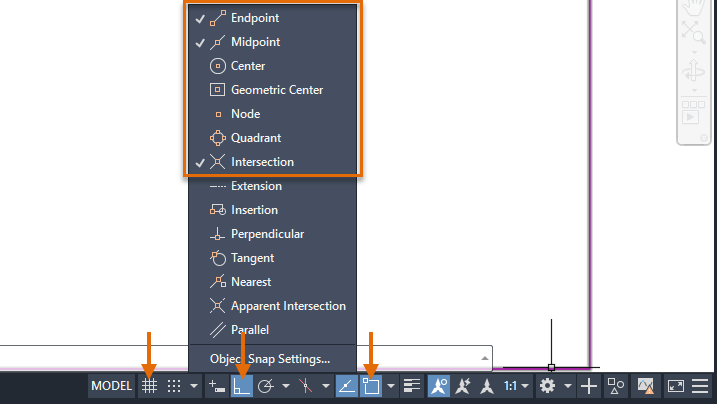
- Sets the running object snaps to Endpoint, Midpoint, and Intersection
- Enables ortho mode and disables grid mode
- In AutoCAD, at the Command prompt, type notepad and press Enter twice.
Notepad will open with an empty document.
- In Notepad, type the following text and press Enter after each line and make sure there is a single blank line after the last line.
Note: The blank line after the -LAYER command is expected here, as we need to press Enter twice to exit the command completely.
-LAYER m title_block c 6 title_block

RECTANG 0,0 828,552
OSMODE 35
ORTHOMODE 1
GRIDMODE 0
ZOOM E
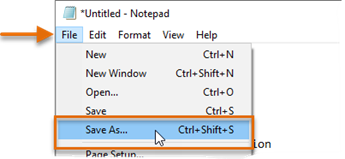
Note: In practice, instead of drawing a rectangle, you would insert a title block with the -INSERT command as shown in the previous section. - On the menu bar, click File > Save As.

- In the Save As dialog box, browse to the Documents folder.
- In the File Name text box, select the default text and type drawing_setup.scr.
- Click the Save As Type drop-down list and choose All Files (*.*).
- Click Save.

; Creates a new layer
-LAYER m title_block c 6 title_block

; Draws a rectangle
RECTANG 0,0 828,552
…
Managing Script Files
Script files can be run from any folder, but it is recommended to store your script files in a shared folder that is identified as part of the AutoCAD Support File Search Path. This ensures your script files are stored with other custom files you might have and makes them easier for everyone to run.
To Modify Support File Search Paths.

Running A Script File in A Drawing
After a script file has been created, it can be run in AutoCAD using the SCRIPT command.
The following steps explain how to run the drawing_setup.scr file, created earlier under the Creating a Script File section:
- Create a new drawing.
- On the ribbon, click Manage tab > Applications panel > Run Script. Find
- In the Select Script File dialog box, browse to and select the drawing_setup.scr file.
- Click Open.
You should notice the extents of the drawing now shows a rectangle that is 828 x 552 units in size on the title_block layer. Additionally, if you look at the status bar, you should notice the three running object snaps are enabled along with ortho mode being enabled and grid mode being disabled.

In addition to the SCRIPT command, you can also run a script file by:
- Dragging and dropping it into a drawing window (Windows only)
- Using the /b (Windows) or –b (Mac OS) command line switch with a desktop shortcut/alias
For more information on command line switches, see About Customizing Startup.
Running A Script from the Ribbon
It is possible to define a macro with the SCRIPT command to run a specific script from a ribbon button. The following is what a macro might look like that starts the SCRIPT command and runs a script file named drawing_setup.scr:
^C^C_script drawing_setup.scr
For information on customizing the ribbon, see the Have You Tried: Design Your Own Ribbon topic.

Running A Script File Across Multiple Drawings
You can download ScriptPro from: http://knowledge.autodesk.com/support/autocad/downloads/caas/downloads/content/autodesk-customization-conversion-tools.html
The following steps explain how to use ScriptPro after it has been downloaded and installed:
- In Windows, click Start menu > Autodesk > ScriptPro.exe.
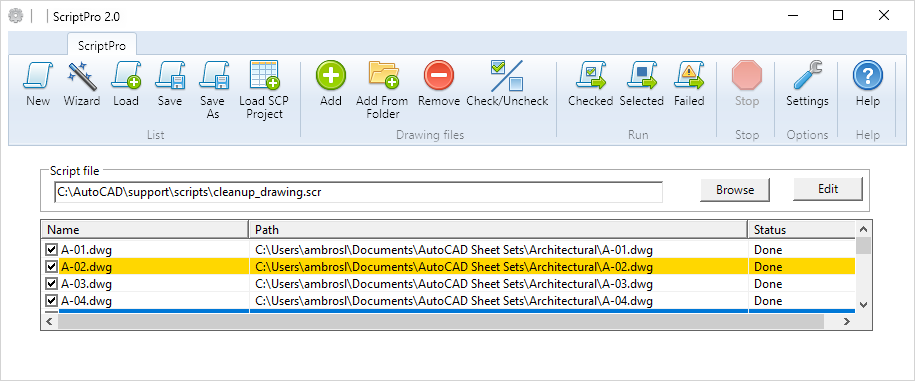
ScriptPro should now be displayed.
- In ScriptPro, in the List panel, click Wizard.
- In the ScriptPro Wizard, under Step 1, click Browse and specify the script file you want to run in the selected drawings.
- Under Step 2, click Add. Browse to and select the drawing or drawings to add, and then click Open.
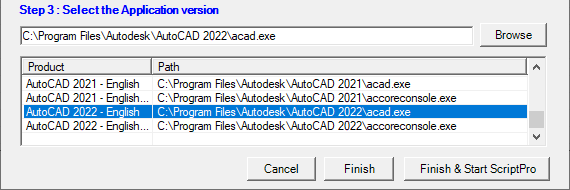
Note: If all the drawings you want to select are in a folder, click Add from Folder and select the folder that contains the drawing files in which you want to run the script file. - Under Step 3, select your installed version of AutoCAD.
Tip:
accoreconsole.exe in the list of Application versions allows you to run ScriptPro with an instance of AutoCAD in the background. This can reduce the amount of time it takes to process all selected drawings. - Click Finish.
- Optionally, click Save As, and specify a location and name for the Drawing List file.
The Drawing List file will allow you to load the selected drawing files back into ScriptPro if you need to re-run the script file.
- Under Run, click Checked.
ScriptPro starts processing each drawing that is checked and updates the Status column as progress is made.
- When ScriptPro finishes, it will prompt you to review the log file generated. Click Yes or No to view the file.
Note: If one or more drawings failed, see the Tips for Using ScriptPro section for some ideas on how to resolve the problem.


Tips for Using ScriptPro
- While ScriptPro only allows you to select a single script file, starting with AutoCAD 2016, you can call a script file from another script using the SCRIPTCALL command. This makes it possible to run multiple scripts in selected drawings with ScriptPro without running the utility multiple times.
- If ScriptPro fails for a drawing, it is possible you may need to increase the delay in which AutoCAD waits before it executes the script file. This can happen if your drawings contain Xrefs or other external referenced files. In ScriptPro, under Options, click Settings. Then in the Settings dialog box, increase the Delay During Process (seconds) value by sliding the slider to the right.
- If a script doesn’t run as expected, under Settings in ScriptPro, you can enable Run the Tool in Diagnostic Mode. This setting enables full command logging and allows you to see how the script might be failing. See the previous image for the location of this option.

| Command | Description |
|---|---|
| DELAY | Provides a timed pause within a script. |
| RESUME | Continues an interrupted script. A script can be interrupted by a press of the Backspace key. |
| RSCRIPT | Repeats a script file. |
| SCRIPT | Runs a script file. |
| SCRIPTCALL | Runs another script file from a script file. |
| System Variable | Description | Default Value | Saved In |
|---|---|---|---|
| CMDDIA | Controls the display of the In-Place Text Editor for the DIMEDIT and QLEADER commands, and the display of certain dialog boxes in AutoCAD-based products. | 1 | Registry |
| FILEDIA | Suppresses display of file navigation dialog boxes. | 1 | Registry |
Script files can help to reduce errors and streamline repetitive workflows. Hopefully, the next time you recognize you are perform a command sequence in different drawings, you will be able to create a script file that helps based on what you learned in this article.
Source: Autodesk