Revision clouds are often used to call attention to portions of a drawing. The REVCLOUD command creates revision clouds as a polyline consisting of a series of sequential arcs to form a cloud-shaped object. These revision cloud polylines are created on the current layer, so it is a good idea to create a separate layer on which to draw revision clouds and other related notes. That way, you can turn that layer off when you do not need to see those objects.
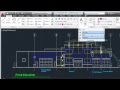
The exercise drawing includes a typical revision cloud, which was created on a layer named REVISIONS. That layer has been assigned the color red and is the current layer.
To create a revision cloud, on the Home ribbon, expand the Draw panel and then expand the Revision Cloud tool. There are three different methods you can use when creating a revision cloud: Rectangular, Polygonal, and Freehand. Whichever method you choose becomes the default the next time you use the command. You can also select an existing object and convert it into a revision cloud.
Click the Rectangular Revision Cloud tool. The program prompts you to specify the first corner point, and in the command window you can see that there are a number of options. There are also a number of predefined settings. For example, the minimum and maximum arc lengths are both currently set to 0.5 units, the Style is set to Normal, and the Type is set to Rectangular.
Right-click and choose Arc Length in the shortcut menu. The program prompts you to specify the minimum length of arc. Type “6” and press ENTER. The program then prompts you for the maximum length of the arc, and the value you just entered is shown as the default. You can specify both a minimum and maximum arc length, but note that the maximum length cannot be more than three times the minimum arc length. Press ENTER to accept the default.
The previous prompt then repeats. When using the Rectangular method, you simply click to pick the opposite corners of the rectangular revision cloud. Pick a point just outside the hinge point of the door in the upper wall. After picking the first corner, the program prompts you to specify the opposite corner and you can see a preview of the revision cloud. Pick a point to the left and below the door. As soon as you pick the opposite corner, the revision cloud is created and the command ends.
Expand the Draw panel, expand the Revision Cloud tool again, and click the Polygonal Revision Cloud tool. In the command window, you again see a number of options and predefined settings. The program remembers the arc length values you specified for the previous revision cloud. Note, however, that the Type is now set to Polygonal. The methods shown in the drop-down are simply options and you can switch types by choosing a different option.
With the polygonal method, the program prompts you to specify a start point. Click to specify a point near one of the conference room chairs. As soon as you do, the program prompts you for the next point, and you can see a preview of the resulting revision cloud. Continue to pick points, working your way around several of the chairs. Once you are satisfied with the revision cloud, press ENTER to end the command.
You can also draw a freehand revision cloud. Expand the Draw panel, expand the Revision Cloud tool again, and click the Freehand Revision Cloud tool. The program prompts you to specify the first point. Before you do, however, choose the Style option. When creating any revision cloud, you have the option of using the normal style or a calligraphy style. Choose Calligraphy. Now the previous prompt repeats. Click and hold to select the start point near the desk in the office. The program then prompts you to guide the crosshairs along the cloud path. Simply move the cursor to indicate the path for the revision cloud. As you move the cursor, the revision cloud takes shape. When you move the cursor back to the starting point, the command automatically ends. The appearance of this revision cloud is different because it was created using the calligraphy style, so each arc has a tapered appearance.
You can also convert an existing object into a revision cloud. The drawing includes a green circle drawn around a door. When you move the cursor over that circle, the tooltip shows that it was created on the CIRCLE layer. Expand the Draw panel and choose any of the Revision Cloud tools. Since you created the previous revision cloud using the calligraphy style that is now the current style. Choose the Style option again and select Normal. Then, either right-click and choose the Object option, or just press ENTER. The program prompts you to select an object. Click to select the circle; no other selection method can be used. As soon as you select the circle, it is converted into a revision cloud, and the program asks if you want to reverse its direction. If the cloud looks the way you want, say No. If you were to say Yes, the arc direction would be reversed. If this was not what you intended, you could start the REVCLOUD command again, choose the Object option, and select the revision cloud again.
Move the cursor over the revision cloud and note in the tooltip that the cloud was created on the current layer, the REVISIONS layer, even though the original circle was drawn on the CIRCLE layer.
After creating revision clouds, you can easily edit their size and shape using grips. For example, select the revision cloud created from the circle. As soon as you do, you can see a center grip and four quadrant grips, enabling you to edit it just like a circle. Press ESC to deselect the revision cloud.
When you select the rectangular revision cloud, vertex grips appear at the corner points and midpoint grips appear along the sides, and you can modify the revision cloud as you would any polyline. Press ESC to deselect that revision cloud.
You can also use a special Modify option to draw new revision cloud segments and erase selected portions of existing revision clouds. Expand the Draw panel, expand the Revision Cloud tool, and click the click the Rectangular Revision Cloud tool. Then, choose the Modify option. The program prompts you to select a polyline to modify. Click near the lower-left corner of the rectangular polyline you created surrounding the door in the upper wall. The program then prompts you to select the next point. Continue picking points, working your way around the desk and chair.
Even though you selected the Rectangular Revision Cloud tool, the Modify option creates a polygonal revision cloud. Click to pick a point slightly below the upper-left corner of the rectangular revision cloud. As soon as you do, the program prompts you to pick a side to erase. When you move the cursor over the left side of the rectangular revision cloud, you can see a preview of the portion of the rectangular revision cloud that will be removed and a small red X cursor badge appears adjacent to the cursor, indicating that the program is about to erase that portion of the revision cloud. When you click, that portion of the revision cloud is erased and the program asks if you want to reverse the direction. If you are satisfied with the results, choose No to complete the revision cloud and end the command. If you had wanted to reverse the direction of the arcs, you would choose Yes.
Source: Autodesk