There’s a long-held misconception that you can’t customize AutoCAD LT. Most likely, this is due to AutoCAD LT not supporting API’s. So, no—you can’t customize it with AutoLISP, .NET, or third-party add-ons.
But you can still customize AutoCAD LT. In fact, almost any interface element that you can customize in AutoCAD, you can do in LT. In this series, we’ll show you a few ways to do just that. Here, we’ll take a look at how to customize the ribbon in AutoCAD LT. Bonus? It’s easy to do, too.
Contents
How to Create a New Ribbon Panel
First, we’ll create a new tab with a single panel that contains some of our favorite tools. When done, it will look like this in the image to the right.
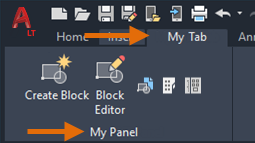
We’ll need both a new panel and a new tab to put it in. You can start with either, but for our example, let’s start with the new panel first.
It all starts with the Customize User Interface (CUI) Editor. You can just type in CUI on the Command Line, or you can find it in the Customization panel of the Manage tab of the ribbon.

Our starting place is the Customization panel in the upper left. We’ll be working in the default ACADLT customization menu. Click on the plus sign in the box next to Ribbon to expand it. When you do, it will expose Tabs, Panels, and Contextual Tab States.
Right click on Panels and select New Panel from the pop-up menu. A new panel will appear at the bottom of the panels list, with its default name (Panel1) highlighted for you to change. We’ll change it to “My Panel.”
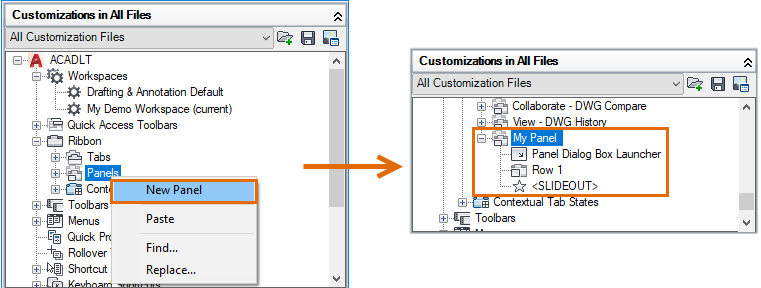
Pretty easy so far, right? Remember, nothing takes effect until you click on the Apply button, so you can always fix a misspelling or just bail out if you’re not comfortable.
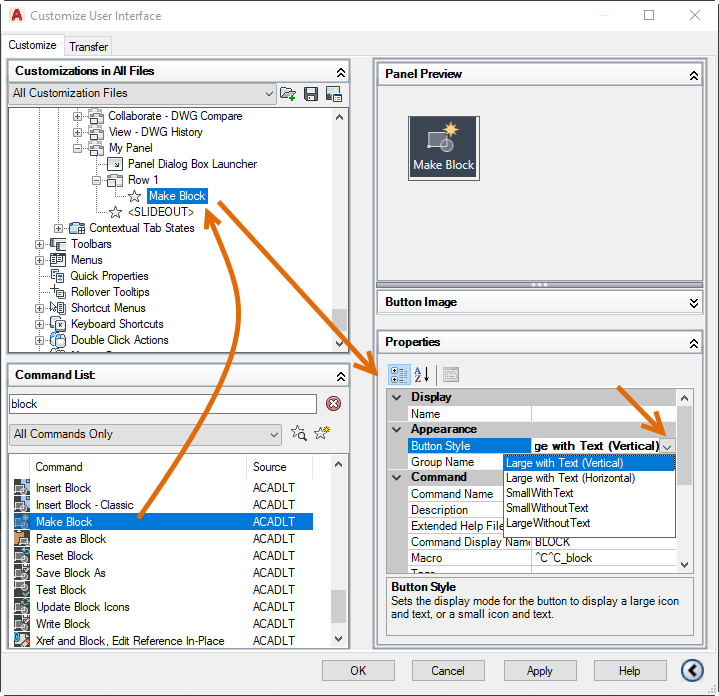
Now that we have a new, custom ribbon panel, we’ll want to populate it with our desired commands. Again, it’s pretty easy. Use the Search box of the Command List pane, which is just below the Customizations pane. We’ll search for “block”. Find the Make Block command, and simply drag it up to Row 1 in your new, My Panel.
Once you do so, you’ll see a preview of your tool in the Panel Preview pane. This is one of our most used block tools, so we may want to make it big. Again, it’s easy.
Highlight the tool in your new panel and go to the Appearance section of the Properties panel (lower right). Find the Button Style pulldown and select Large with Text (Vertical). As you probably expect, the Preview will update to reflect your change.
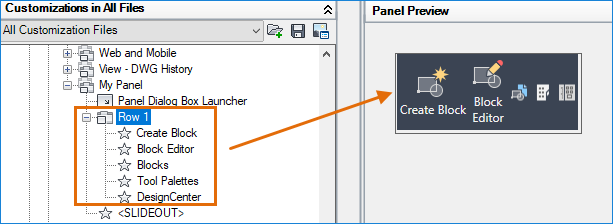
From there, we’ll continue by adding in the Block Editor, making it the same size as Make Block, and then we’ll add Blocks Palette, Tool Palettes and DesignCenter. These last three we’ll make Small Without Text – ending up with a panel that looks like the one below.
Note: Changing the order of your tools in the panel is just a drag and drop operation. The CUI Editor will display an Indicator Bar to let you know where you’re placing your tool.
How to Create a New Ribbon Tab
Now, you have a custom ribbon panel complete with your favorite block commands. But we also want it to show up under our own, custom tab. Let’s make one and add our new panel to it.
It’s as easy as right clicking on the Tabs entry under Ribbon. Choose New Tab. It will appear at the bottom of the list and a highlight to allow you to edit its name. (Sound familiar? It’s the same workflow as making a new ribbon panel. Learn one and you’ve learned both!)
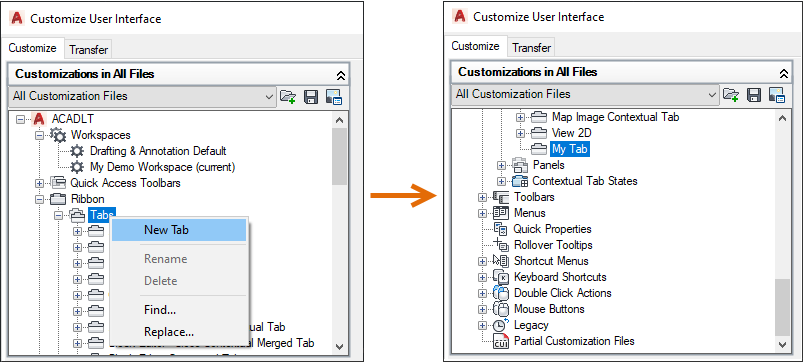
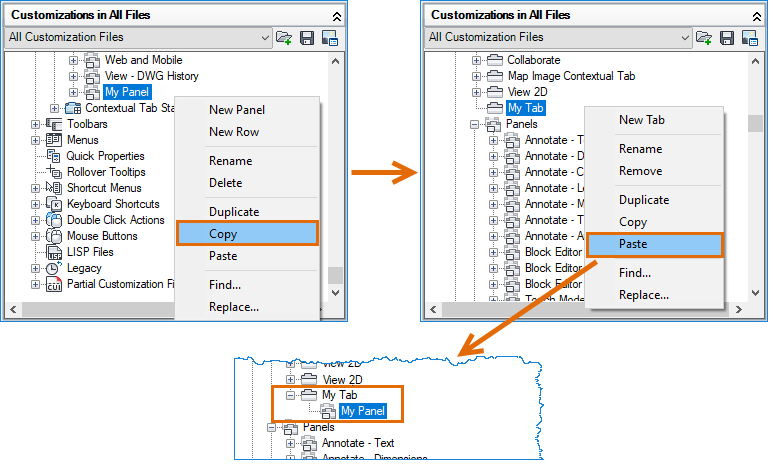
Now, we just need to add our new panel to our new tab. Open the Panels section of the Ribbon in the Customizations pane and find My Panel. Right click on it and choose Copy.
Next, find My Tab that you just created. Highlight it and right click. Choose Paste. You’ll see your new panel show up under your new tab.
Congratulations. You’ve just customized AutoCAD LT… and they said it couldn’t be done!
How to Add a Ribbon Tab to a Workspace
New ribbon tabs are not automatically added to a Workspace, so there’s one more step to being able to use your new tab and panel.
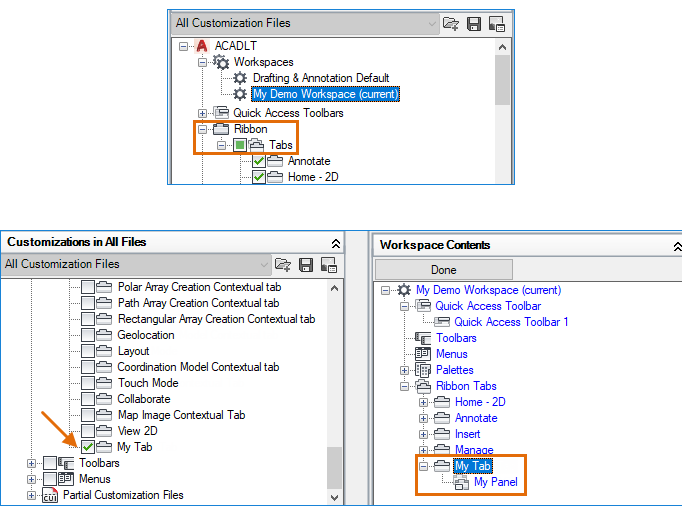
And, just like all the other steps we’ve learned so far, it’s easy too. Make sure the Workspaces section under the ACADLT menu is expanded. Highlight your current workspace (or where you want the new tab/panel to appear).

Scroll to your new My Tab and check its box. When you do, it will show up in the Customize Workspace pane. Click on Done, and you’re, well, done! Make sure you click either Apply or OK from the main Editor, and your new Tab and Panel combo is ready to use.
Be sure to check out the entire series and the next article where we’ll discuss more about the customization of AutoCAD LT and workspaces.
Source: Autodesk
