Nearly all of our AutoCAD drawings require annotations – and some great features have been added into AutoCAD to make them easier than ever. Join me as we cover some of the handy tools that will help you get those annotations done as quickly as possible!

Contents
Smart Dimensioning
Let’s face it – nobody gets excited about dimensioning. It’s tedious, requires too many picks and clicks and is just plain boring! If you’ve ever felt the same way – then you are going to love the new Smart Dimensioning in AutoCAD 2017!
Let AutoCAD 2017 take the tedium out of dimensioning with the updated DIM command. It’s a handy command smart enough to detect objects and provide various visual dimension options. That’s right – many fewer picks and clicks!
Enter the new DIM command and check out the horizontal, vertical, and aligned dimension previews when you select a linear object. Next, simply place the desired dimension where you want it to go! The nice thing here is that the default values are automatically assumed for the dimension text and angles, which means fewer steps for you (but don’t worry, you can still change those values from the right-click menu or command line).
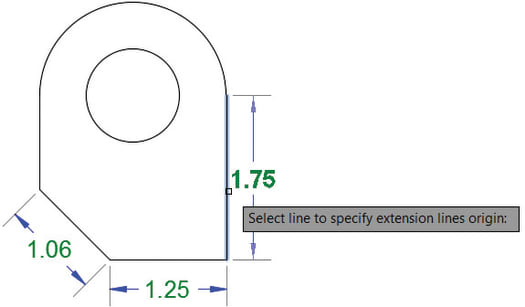
Need to do an angular dimension? No problem – just select two non-parallel linear objects to display and place an angular dimension!
Hover over a circle or arc to preview and place diameter or radial dimensions (and by the way, arcs come with the additional option to create an angular dimension).
As an added bonus, increase your efficiency by using the new DIMLAYER command to set/create a default layer for dimensioning. A new layer drop-down has also been added to the Dimension panel. Think of all the time you’ll save not changing your current layer around.
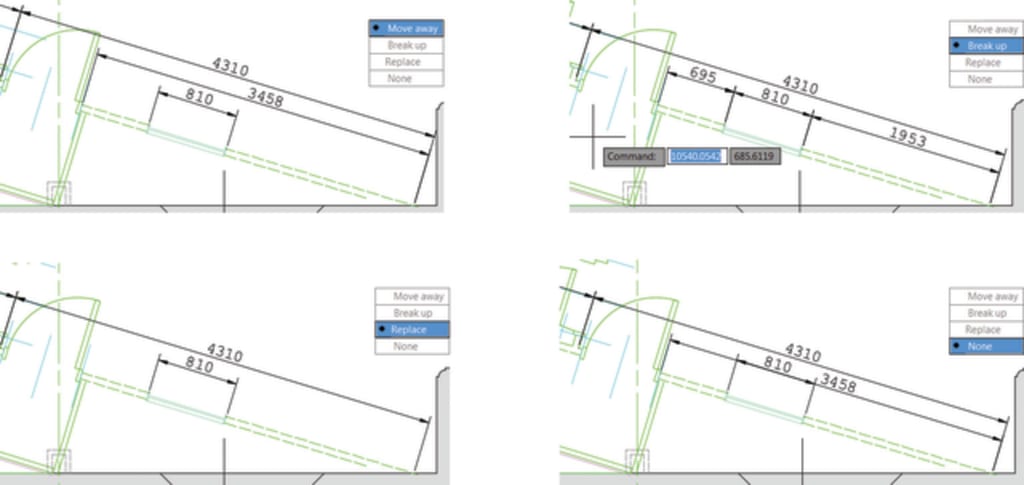
Worried about overlapping dimensions? Don’t be. If you attempt to create an overlapping dimension, you’ll see options to move, break up, or replace the existing dimension. Your drafting teacher will be so pleased!
The DIM command remains active until you exit it, so go ahead and knock out multiple dimensions at one time. Think of all the time you can save!
Bonus Tip: If you prefer to specify a type of dimension, you’ll find the various dimensioning options in the right-click menu.

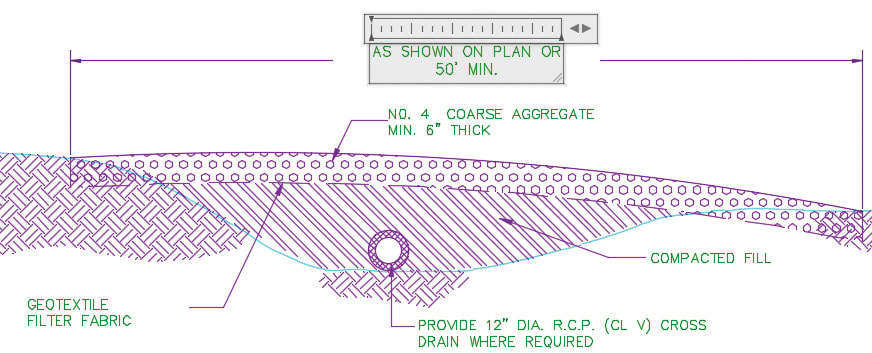
Double Bonus Tip: Use the width sizing control to wrap dimension text! (another one of the many AUGI Wish List items granted!).
More Tuesday Tips
Come back in two weeks for more hints on annotations, and don’t forget to check out the full Tuesday Tips With Lynn series in the meantime. Want it all in one place? Register to download the Best of Lynn Allen’s Tips & Tricks!
Source: Autodesk