In Part 1 of my Quick Access toolbar tips, I discussed the benefits of customizing the QAT and how to accomplish customizing the QAT with the Customize menu and ribbon. Now, I’ll explain how the Customize User Interface (CUI) editor can be used to create and manage Quick Access toolbars.
Using the CUI editor, you can perform these QAT customization tasks:
- Create and delete Quick Access toolbars from the loaded main customization (CUIx) file
- Add and remove tools from a QAT: buttons, controls, and drop-down menus
- Reorder and group tools
- Assign a QAT to a workspace defined in the current customization (CUIx) file
Contents
Customizing the Current QAT
The Customize menu on the QAT contains a limited number of tools which can be displayed, but you can access a much wider range of tools by customizing the QAT with the CUI editor (see Figure 1). The CUI editor can be used to fully customize the QAT along with the ribbon, “legacy” pull-down menus, “legacy” toolbars, and other user interface elements in the AutoCAD environment. When using the CUI editor for the very first time, the natural response by many is to feel slightly overwhelmed because of the layout and number of controls. Don’t worry, once you spend a little time in the CUI editor you will feel much more comfortable and confident in customizing the AutoCAD environment.
 Figure 1. Customize User Interface (CUI) editor
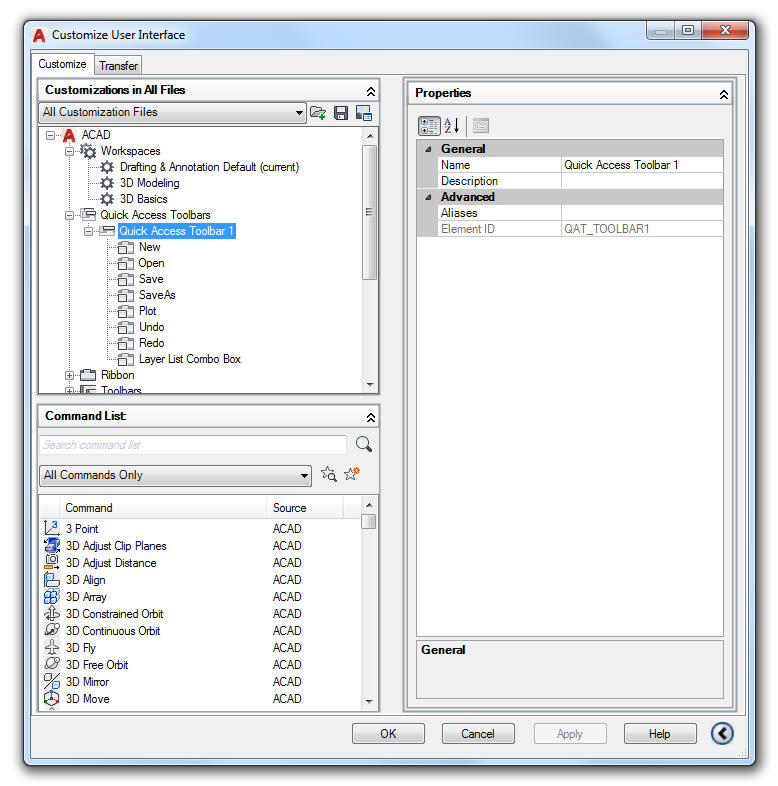 Figure 1. Customize User Interface (CUI) editor
The Customizations In pane, in the upper-left corner, is used to create and access the various user interface elements that can be customized in the AutoCAD environment with CUI editor. From this pane, you can access the default and any other Quick Access toolbars that are stored in the loaded main customization (CUIx) file. The Command List pane contains the commands and controls that can be added to a QAT or another user interface element, and the Properties pane contains the settings and values that are used to control the display and behavior of a tool in the AutoCAD user interface. When a command or control is placed on a user interface element, additional properties are displayed for that tool in the Properties pane.
When a QAT node is expanded in the CUI editor, you can drag tools up and down under the node to change the order in which they appear. The topmost tool under the QAT node appears as the left most tool displayed on the QAT, while the bottom most tool appears on the right side of the QAT and adjacent to the Customize menu (see Figure 2).
 Figure 2. Organization of tools on the QAT compared to their structure in the CUI editor
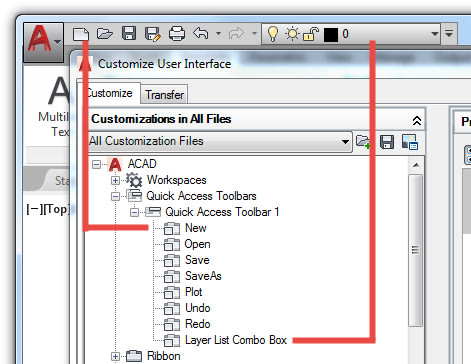 Figure 2. Organization of tools on the QAT compared to their structure in the CUI editor
Along with changing the order in which tools appear on the QAT, you can group related tools by inserting a separator or adding a drop-down menu. A separator appears as a vertical bar on the QAT in the AutoCAD environment, while a drop-down menu allows you to combine multiple related commands into a single tool that appears on the QAT. For example, you might choose to create a drop-down menu and add the Plot, Publish, and Export to PDF tools to provide access to all three tools without using up too much additional space (see Figure 3).
You can insert a separator by right-clicking over a tool under the QAT node and choosing Insert Separator. The new separator is inserted above or before the tool you right-click over. A drop-down menu can be added by right-clicking over a tool under a QAT node and choosing New Drop-down. When a new drop-down menu is added, it appears at the bottom of the QAT node in which it is added. After the new drop-down menu is added, it can be dragged up or down under the QAT node to change its position. Then once the new drop-down menu has been positioned, the commands to be displayed on the drop-down menu can be dragged and drooped from the Command List pane. Dropping a command on the Primary Command option under the drop-down menu sets it as the default command to be executed when the Behavior property of the drop-down menu is set as Split (see Figure 4).
 Figure 4. The Properties pane contains properties that are used to control the appearance and behavior of a drop-down menu
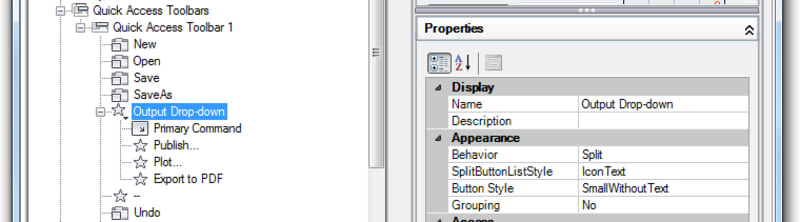 Figure 4. The Properties pane contains properties that are used to control the appearance and behavior of a drop-down menu
Tools that you no longer want to appear on the QAT can be removed. You remove a tool on the QAT by right-clicking over the tool and choosing Remove (see Figure 5). If you are removing a separator from the QAT, the Remove item is named Delete instead. In the Confirmation message box, click Yes to confirm the deletion of the tool or separator. If you remove the wrong tool or separator, click Cancel at the bottom of the CUI editor to abort the change made.
 Figure 5. Removing a tool from the QAT in the CUI editor
 Figure 5. Removing a tool from the QAT in the CUI editor
Creating a New QAT and Setting It Current
The default QAT is stored in what is referred to as a customization (CUIx) file which is edited using the CUI editor. In addition to the QAT, a CUIx file contains the definitions of many other user interface elements that make up the AutoCAD environment. More than one QAT can be defined in a CUIx file, but only one can be displayed at a time. The main benefits of defining multiple Quick Access toolbars is to keep the default QAT unchanged while having a QAT to customize, and to allow you to display different tools based on which workspace is current. As an example, you might want to display some discipline or industry specific drawing setup tools on the QAT for each different group in your company.
Click here for step-by-step instructions on creating a new QAT named “My QAT.”
The Benefits of the CUI Editor
The CUI editor gives you much greater control over the tools and the organization of those tools on the QAT, compared to just using the Customize menu and ribbon. In this article, I covered the key concepts needed to create and manage Quick Access toolbars with the CUI editor. Many of the concepts covered are also the basics needed to customize other user interface elements, such as the ribbon, shortcut menus, and double-click actions. My hope for this two-part series on customizing the Quick Access toolbar is that you have a better understanding of how you can gradually get started with customizing the AutoCAD environment and make small, but impactful, changes that lead to increased productivity.
Check out the entire basic AutoCAD customization series, and tune in next time to learn the best ways to share your customizations. For more from Lee, follow him on Twitter.
More on the Quick Access Toolbar:
Source: Autodesk