It’s Tuesday again, and I’m excited to share today’s tip with all of you. We’ll be taking a look at a hidden gem of a tool that’s available in the Express Tools ribbon tab of AutoCAD.
As I’ve mentioned in previous Tuesday Tips articles, I like to share tools and tips that tend to be less known or underutilized but can still provide a boost to your productivity and workflow. Today, I want to highlight another Express Tool that can come in handy no matter what type of drafting or design you do—Auto Number. As the name implies the Auto Number command allows you to automatically add a number to selected labels or text within a drawing.
I’m going to show you how Auto Numbering can be used to quickly create numbered callouts or to renumber existing callouts within a drawing. (Be sure to check out my YouTube video at the end for a first-hand demonstration!) Auto Numbering is something that many of us could use to speed up drawing production and add to our daily workflows.
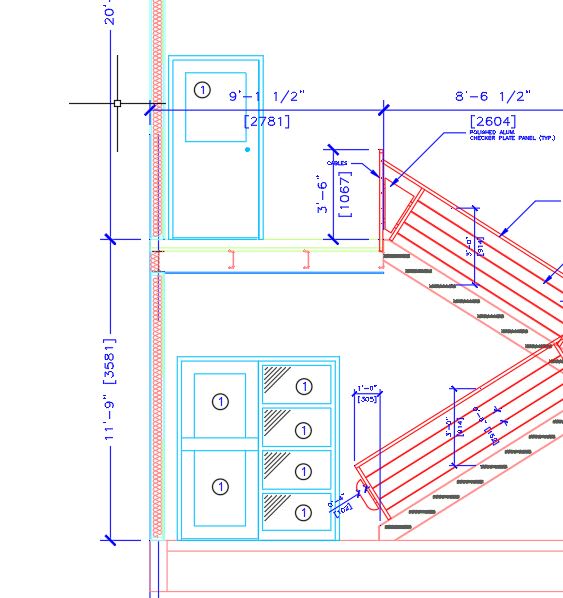
First up, we need to create our first or typical callout. This can be done a variety of ways; we just need to have a text object that can be used to add our auto numbers. In the image to the right, we have a mtext object containing the number one as well as a circle object around it.

Once you have your typical callout created—which can be similar to mine or any style you’d like as long as there is a text object to add a number—simply copy it around the drawing to each location where a callout/reference number is needed. In the example to the right, the callout is used as a window reference number and has been copied to each window in the example detail.
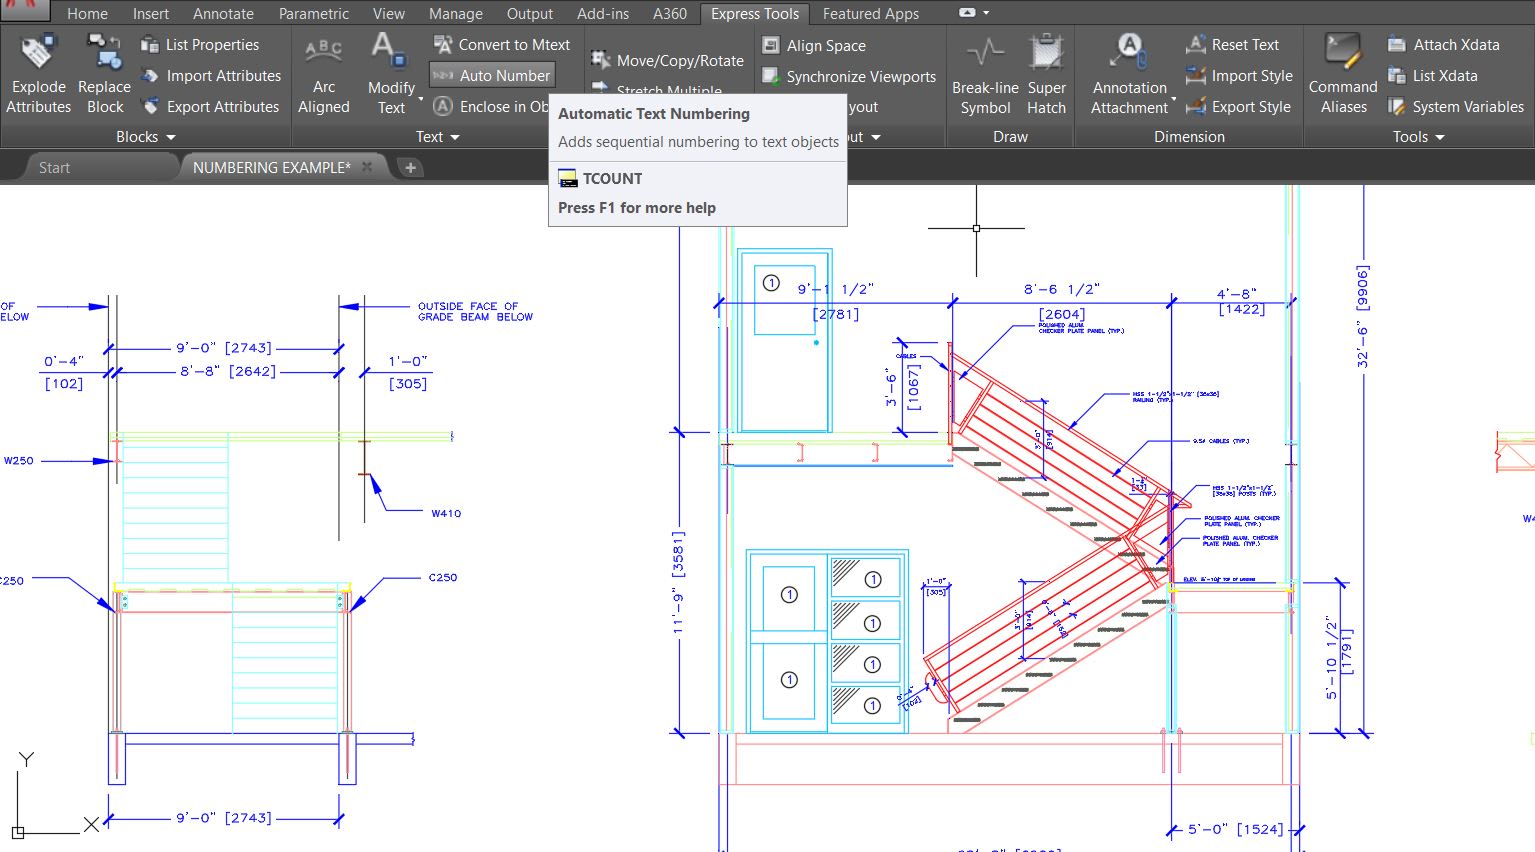
After we’ve placed all of our callouts/references, it’s time to use the Auto Number tool to automatically number them. To find the Auto Number tool, simply click over to the Express Tools ribbon tab and select the command under the text panel as shown to the right. You can also use the text command of TCOUNT to start the Auto Number function.
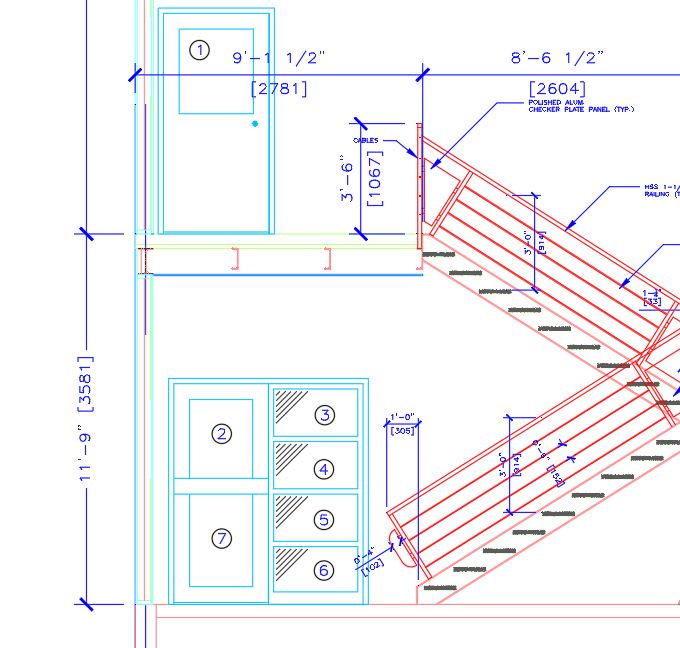
Once you activated it, we need to select all of the text objects that will be numbered/renumbered. (Note: if you would like them to be numbered in a specific order, be sure to select them in that order). After this, simply hit enter to get to the first selection prompt. Here, we can choose the option for how the text objects will be sorted for numbering. The X option will number the objects with the lowest number starting from the furthest left and increasing to the right. The Y option will number the objects with the lowest number starting at the top and decreasing to the bottom. And the Select-order option will then number the objects in the order that you selected them with the first being the lowest.
In the example below, we have used the Select-order option.

With this next prompt we can now choose the starting number for our callouts as well as the increment the numbers will increase by. In the example below, we’ve stuck with a standard numbering starting with 1 and increasing by 1 with each object.

Finally, the last prompt allows us to decide how the numbers will be places in the text objects. The options include adding a prefix before the rest of the text (i.e., numbering notes like 1 – This is note one…), a suffix after the existing text, overwriting the existing text (this is the option we will use to simply update the numbering), or using the find & replace option to change up existing text/numbers in your objects.

After choosing our placement option and hitting enter, you can see in the example that all of our callouts have been updated and automatically numbered according to our selections and prompts.
As mentioned earlier, using Auto Number in AutoCAD on a regular basis can be a surprising time saver when working on details and notes for a drawing. I hope you’ve enjoyed learning a little bit about this great Express Tool and highly recommend checking it out and trying this and other Express Tools on your own projects. If you’d like to take your drawing automation one step further, don’t miss my previous post on how to automate scale text labels using Fields here.
To learn more about the Auto Number tool and to see it in action, be sure to check out my YouTube channel and the accompanying video below:
That’s all for today’s Tuesday Tip. I hope you all enjoyed it and look forward to the next one!
More Tuesday Tips
Check out our whole Tuesday Tips series for ideas on how to make AutoCAD work for you. Do you have any favorite AutoCAD tips? Tell us in the comments!
Source: Autodesk